What Are the Steps in the CNC Machine Operation Process
CNC machines, computer numerical control rigs, are the real deal for steering tools and parts with pinpoint accuracy via software. They slice, drill, or mill anything from steel to plastic to wood like nobodys business. Youll spot em cranking out parts in car shops, aerospace plants, even furniture joints. Operating one? You better have every step locked down cold to churn out primo parts, cut down on scrap, and not get yourself or the machine in a bind.
Knowing the process is straight up critical. One dumb slip can torch a part, snap a tool, or worst case, send someone to the ER. Ive watched newbies in the shop tank whole runs just cause they blew past a double check or botched a setup. Getting tight with every move doesnt just make you faster, it builds your swagger and keeps the shop a safe place to roll.
Design and Programming
It all starts with a design. You need a clear blueprint that tells the machine exactly what to do. This usually means a CAD model—a digital drawing made with software like SolidWorks or AutoCAD. If you’re not the one drafting it, you might get a ready-made file from a client or engineering team. Either way, you gotta check it over, make sure the dimensions and shapes line up, so you don’t waste time later.
Next up is turning that design into something the machine can understand using CAM software. I’ve used tools like Mastercam or Fusion 360 to convert CAD files into actual toolpaths. This is where you’re telling the machine how the tool should move, how deep to cut, and how fast to go. Once that’s done, the software spits out a bunch of G-code and M-code—the “instruction manual” for the CNC machine. I always give the code a quick scan to catch any obvious issues, like path collisions or weird jumps. With that squared away, you’re ready to load it into the machine.
Machine Setup
Machine setup is where the rubber meets the road in CNC operations—get this wrong, and the rest of the job’s toast. First off, you gotta pick the right machine. Not every CNC is built for every task. For instance, a small aluminum part might be fine on a three-axis vertical mill, but a complex titanium piece could demand a five-axis rig or something with a beefier spindle. I always check the blueprint and material specs to make sure the machine’s travel range, spindle power, and RPM can handle the job.
Once the machine’s chosen, it’s time to load up the tools. Picking the right tooling depends on what you’re doing—think end mills for roughing, ball mills for finishing, or drills for holes. Before mounting anything, I inspect the tool holders and collets for dings or wear. After installing, I use a tool setter to verify the length and diameter are spot-on. With tools ready, securing the workpiece comes next. It’s gotta be locked down tight on the machine bed or fixture with zero wiggle room. I’ll use a vise, T-slot bolts, or custom fixtures depending on the part’s shape and size. Once it’s clamped, I double-check with a dial indicator to ensure the workpiece lines up perfectly with the coordinate system.
Last up is loading the G-code into the machine’s control system. Most modern CNCs have a touchscreen or keyboard, so it’s as simple as plugging in a USB drive. After uploading, I scroll through the program on the control panel to catch any error codes—like bad syntax or overtravel warnings. Everything checks out? Then you’re good to move forward. This step’s all about attention to detail; one slip-up here can tank the whole run.
Material Preparation
Material prep is where CNC machining kicks off, and if you screw this up, you’re just setting yourself up for failure. First, you gotta choose the right raw material based on the blueprint and job specs. Aluminum’s great for lightweight parts, steel’s your go-to for heavy-duty stuff, and plastic or wood might be perfect for decorative pieces. I always double-check the material specs—think alloy grade, hardness, or even wood grain direction—to make sure it matches the design exactly. Pick the wrong stuff, like using soft aluminum for a hard aluminum job, and you’re gonna wreck both the tool and the part.
Once you’ve got the material, you often need to measure and rough-cut it to size. You don’t always get stock that’s ready to go, so I’ll use a bandsaw or shear to chop it down close to the final dimensions, leaving some wiggle room for the CNC to finish. This part’s gotta be precise—I measure twice with calipers or a tape to avoid cutting too small and scrapping stock or leaving it too big to fit the fixture. After cutting, I check the edges to make sure there’s no nasty burrs that’ll mess with clamping.
Finally, the material’s gotta be clean and flawless. A speck of grease, rust, or a scratch on the surface can throw off precision or even trash your tools. I wipe down metal with solvent or lightly sand wood to get it smooth. For metals, I also look for hidden issues like cracks or inclusions—recycled stock can look fine but be junk inside. I’ll use a magnifying glass or tap it to listen for off sounds. Confirming the material’s good to go saves you a ton of headaches down the line.
Tool Calibration and Machine Warm-Up
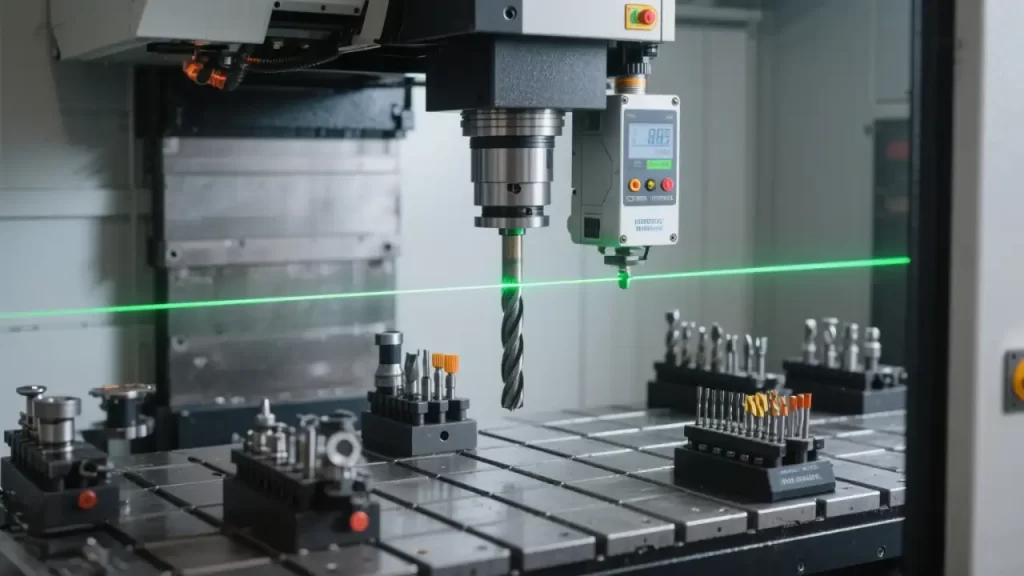
Tool calibration and machine warm-up are make-or-break for getting precise parts. Skip this, and you’re asking for trouble—like driving without checking your tires. First up is calibrating the tools. Every time I mount a tool, I use a tool setter or laser system to check its length and diameter, making sure they match the program dead-on. Tool length compensation has to be within a thousandth of an inch, or your depths will be off, and the part’s scrap. For multi-tool jobs, I punch in the offset for each one into the controller and double-check I didn’t mix anything up. Once calibrated, I’ll spin the spindle by hand to feel for any weird vibrations and make sure the tool’s clamped tight.
Next, you set the workpiece coordinate system—the zero point. This tells the machine where the “origin” of your part is. I usually use a probe or edge finder to locate the X, Y, Z datums on the workpiece, then plug those into the control panel. You gotta be careful here, because being off by a millimeter throws the whole toolpath out of whack. After setting it, I’ll jog the machine at low speed to verify the tool’s hitting the right spots on the part. Especially with complex pieces, I’d rather spend an extra couple minutes checking than regret it later.
Last is warming up the machine, especially first thing in the morning or for high-precision jobs. CNC components—spindles, rails, bearings—can be a bit “stiff” when cold, and thermal expansion messes with accuracy. I run a warm-up cycle, letting the spindle idle for a few minutes or moving the machine unloaded to get everything settled. Ten to fifteen minutes usually does it, but on big machines or in a freezing shop during winter, it might take longer. This isn’t just about making the machine last longer—it’s about getting parts you can trust.
Test Run and Verification
Test runs and verification are your safety net in CNC machining, catching issues before you waste material or time. First thing I do is a dry run—no cutting, just letting the machine follow the toolpath with the tool clear of the workpiece. I’ll usually raise the Z-axis a bit or run it in open air to make sure the paths look good. I keep my eyes glued to the controller’s coordinates and the machine’s actual moves, watching for any weird jumps, overcuts, or crashes into fixtures. Especially with complex parts, a dry run can spot little glitches the CAM software didn’t catch.
Next up is simulating the program. Most modern CNC controllers have a built-in feature that shows the toolpath and machining outcome on-screen. I go through it carefully, looking for errors like the tool hitting an unmachined area or getting too close to a fixture and risking interference. If something’s off, I’ll tweak the G-code or go back to the CAM software to fix the strategy. Some programs even estimate cycle time, which helps me see if the toolpath’s too cautious or overly aggressive.
Finally, if the dry run or simulation flags issues, I adjust parameters. For example, if the toolpath’s solid but the feed rate’s too high, it could burn the tool or ruin the surface finish, so I’ll dial it back 10-20%. If the spindle speed’s too low, you might get chatter or drag out the job, so I’ll bump up the RPM based on the material and tool specs. After tweaking, I run another dry test to confirm it’s good. This step takes patience—better to test a few extra times than dive in and risk scrapping the part.
Machining Process

The machining process is where the action happens—once you hit start, the CNC gets to work for real. First, I triple-check everything: workpiece clamped, tools calibrated, G-code loaded. Then I press the cycle start button to kick off the cutting. For the first few seconds, I’m glued to the machine, watching the tool’s initial cut to make sure the entry point and depth are exactly what I expect. If it’s a new program or pricey material, I might run it in single-step mode, creeping through the first few lines of code to confirm it’s all good before letting it rip.
Once it’s rolling, keeping an eye on the machine’s condition is everything. I’m constantly checking for tool wear, especially during high-speed cuts or tough materials. A worn tool can mess up surface finish or throw off dimensions, so I listen to the cutting sound—if there’s a screech or odd hum, it’s time to pause and inspect. I’ll also lightly touch the machine’s frame to feel for vibrations; too much shake could mean the feed rate’s too high or something’s loose, and I’ll tweak it on the spot. Modern machines with sensors are a big help—I watch the cutting force and spindle load readouts to avoid overloading anything.
Coolant or lubricant supply’s gotta stay on point too. For metals like aluminum or steel, coolant’s usually a must to keep things cool and flush away chips. I make sure the nozzles are aimed right at the tool-workpiece contact zone—otherwise, overheating can trash the tool or part surface. For dry cutting or materials like wood or plastic, I might use compressed air to clear debris, but I still check the airflow’s steady. If the coolant clogs or the pump acts up, I hit pause and fix it before moving on. There’s no shortcut here—eyes and ears on the job the whole time to make sure the parts come out fast and flawless.
Quality Control

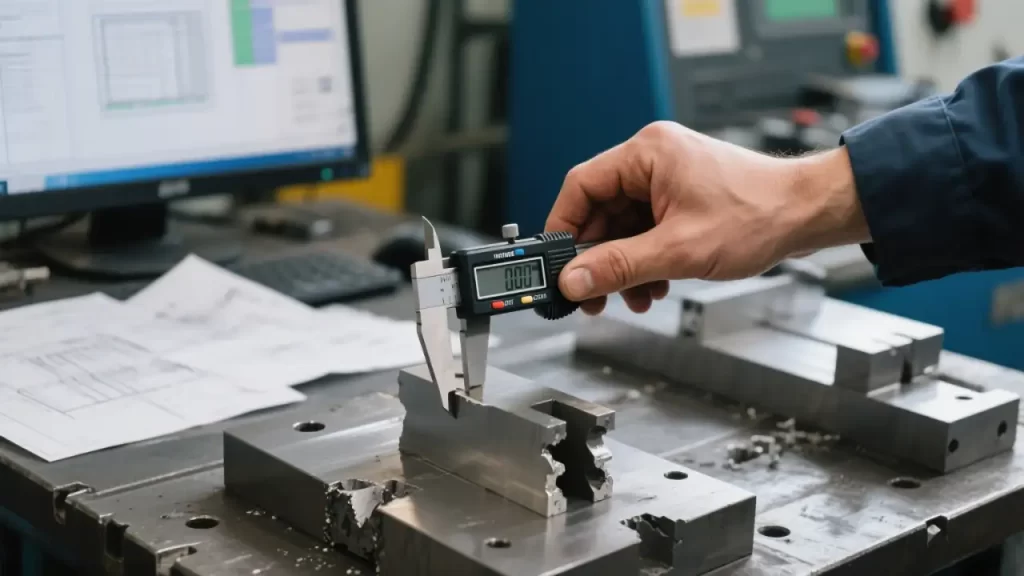
Quality control is the final checkpoint in CNC machining to make sure all your hard work spits out a part that actually works. First thing after machining, I pull the part off the fixture and start checking its accuracy. For straightforward stuff, I grab a caliper or micrometer to measure critical dimensions—hole diameters, slot widths, or distances between surfaces—to confirm they match the blueprint. For complex shapes or tight tolerances, I go straight to a coordinate measuring machine (CMM). That thing scans the whole part and spits out a 3D deviation report, accurate to microns. I also like using a surface roughness tester to check finish, especially when the client wants a mirror shine.
Once I’ve got the measurements, I compare them line-by-line to the design specs. Blueprints usually list tolerances, like ±0.01 inches or even tighter, like ±0.005 mm. If everything’s in range, the part’s good to go, and I move on to the next one. But if something’s off—say, a hole’s too big or flatness is out—I hit pause and dig into why. Could be tool wear, a programming hiccup, or even material warping from heat. I jot down the deviations to see if it’s a one-off or a pattern across parts.
If there’s an issue, I tweak the process for the next run. For instance, if a hole’s coming out undersized, I might swap in a fresh tool or dial back the feed rate to ease up on cutting forces. If the same error keeps popping up, I could need to tweak the toolpath in the CAM software or re-zero the machine. After changes, I’ll run a test piece and measure again to make sure it’s fixed. QC’s where you get serious—one bad part slipping through can tank your rep on a whole order.
Post-Processing
Post-processing is where you wrap things up, turning the machined part into something ready to use or ship. First step is getting the workpiece off the machine, and it’s not as simple as it sounds. You gotta be gentle, especially with thin-walled parts or ones needing a perfect finish—one wrong move and you’ll scratch or bend it. I loosen the fixture slowly, holding the part steady to make sure it doesn’t catch before pulling it free. If there’s coolant or chips clinging to it, I hit it with compressed air to keep the table and part clean.
Next comes deburring and cleaning. After CNC work, parts often have burrs along edges, especially around holes or milled slots. I use a hand deburring tool or a sanding wheel to knock those off, moving carefully to avoid messing with dimensions or surface finish. Cleaning’s just as critical—metal parts can have oily residue, while plastic or wood might be dusty. I wipe down metal with solvent or use a soft brush for non-metals to get them spotless. For super picky clients, I’ll run parts through an ultrasonic cleaner to zap any tiny contaminants.
Finally, some parts need extra work based on the specs. Aluminum might go for anodizing to fight corrosion, steel could need heat treatment for hardness, or a part might call for polishing to a mirror shine. I either send these jobs to a specialty shop or handle them in-house with a polishing machine, depending on the order size and what gear we’ve got. Polishing takes a steady hand—you don’t want to round off edges and screw up tolerances. For coatings, I check the surface for flaws first to make sure paint or plating goes on flawless. Once all this is done, the part’s truly “finished”—rock-solid quality that keeps the customer happy.
Machine Maintenance and Shutdown
Machine maintenance and shutdown are the last steps in CNC work, and doing them right can keep your rig running smooth for years while saving on repair bills. After a job’s done, I start by cleaning the machine and work area. Chips, coolant, or oil left behind can corrode rails or clog systems if you let them sit. I grab a shop vac or broom to clear the machine bed, T-slots, and floor around it. The coolant tank gets a once-over too—I scoop out debris to keep the pump happy. If there’s grease or oil on the machine, I wipe it down with a degreaser to keep the ways and spindle dry. A clean shop doesn’t just look pro; it stops tiny particles from screwing up your next job.
Then it’s time to check tool wear and store everything properly. I inspect every tool after use, usually with a magnifying glass or tool microscope, to spot chipped edges, wear, or built-up material. A lightly worn tool might get resharpened for another go, but if the edge is toast, it’s time for a replacement. I log the tool’s number and update its life in the tool library. Used tools get wiped down, coated with a dab of rust-preventive oil, and stashed back in the rack or a dedicated case to avoid dings. I also give the tool holders and collets a quick check for cracks or wear so they’re ready for next time.
Finally, I shut down and update records. Before cutting power, I run a homing cycle to park the spindle and table in a safe spot, preventing any limit switch crashes on startup. I make sure the coolant pump and lube system are off, then flip the main switch. After that, I jot down the day’s details—tools used, parts made, any hiccups—in the computer or a logbook. Those notes are gold for troubleshooting later or tweaking programs. Maintenance and shutdown aren’t glamorous, but doing them right keeps your machine and your work solid.
Conclusion
The whole CNC machining process, from design to shutdown, is like running a marathon in the shop—every step’s gotta connect just right. You start by turning ideas into CAD models and G-code, then pick the right machine, mount tools, and lock down the workpiece. Materials need careful prep, tools gotta be dialed in, and test runs have to be bulletproof. During machining, you’re watching everything—tool wear, vibrations, coolant flow. After, it’s measuring dimensions, deburring, post-processing, then cleaning the machine and logging data. Miss a beat, and you’re either scrapping parts or stressing the equipment.
Precision and safety are the heartbeat of CNC work. Being off by a thousandth of an inch can tank a part, especially in fields like aerospace or medical where tolerances don’t budge. Safety’s even bigger—spindles spinning thousands of RPMs and tools moving like lightning can hurt someone or wreck gear if you’re not careful. I’m always preaching in the shop: check first, act second. Taking a little extra time beats rushing into a mistake. Nail these steps, and you’ll crank out killer parts, keep your machine happy, and work with confidence.